


State management is a fundamnetal principle in building functional Flutter applications. As apps get bigger and more sophisticated, managing state becomes a challenge that must be tackeled effectively. There are many state management tools out there and one of them is Redux flutter, inspired by the famous javascript library with the same name.
PermalinkThe Redux way
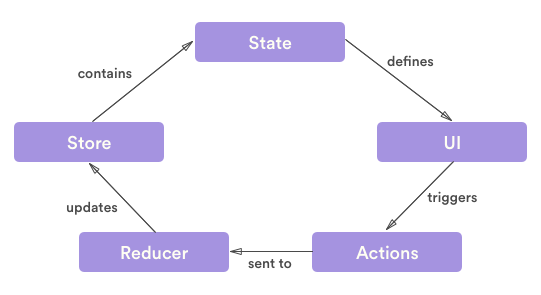
Redux flutter is a state management tool that work with three main components: state, actions,and reducers.
State is the app data that changes during user interaction. In Redux state is the single point of truth for the whole application. It is kept in a store which is, as the name suggests, a container that hold the state.
Actions are objects that descripe what changes should be done on the state. They are the only way to alter the state, which isures that there's a single access point for manipulation, leading to a more efficient centralized way to manage state.
Reducers are functions that take the previous state and an action, then returns a new state with the changes specified by the action.
The most important principle in redux is that state is never modified or mutated, but rather every time the user triggers a state change from the UI an action is dispatched to the reducer, which thens return a new copy of the previous state with changes done by the user, finally this new state is saved as the current app state in the store.
PermalinkRedux in action
With that redux knowledge in mind, let's explore how to manage state of a small notes app where we can add and delete notes.
- Depend on flutter_redux
dependencies: flutter_redux: ^0.6.0 - Create a simple model class
class Note {
    String title;
    String text;
}
- Build the store, which is a simple class containing all the app data to manage. In our case the store will contain the list of notes
class AppState {
    final List<Note> notes;

    AppState({@required this.notes});

    AppState.initialState(): notes = List.umodifiable([]<Note>);

    AppState copyWith({List<Note> notes}) => AppState(notes: notes ?? this.notes);
}
- Add our action classes, which represent the changes we'll do later to the state.
class AddNoteAction{
    final Note note;
    AddNoteAction({@required this.note});
}

class DeleteNoteAction{
    final Note note;
    DeleteNoteAction({@required this.note});
}

class DeleteAllAction{}
- Finally, we write our reducer function. And to refactor the code even more we'll use another reducer to alter the notes. So we end up with two reducers: appReducer and notesReducer.
AppState appReducer(AppState state, dynamic action){
    return AppState(
            notes: notesReducer(state.notes, action)
    );
}

List<Note> notesReducer(List state, action){
    if (action is AddNoteAction){
        return []
        ..addAll(state)
        ..add(action.note);
    }
    if (action is DeleteNoteAction){
        return List.unmodifiable(List.from(state)..remove(action.note));
    }
    if (action is DeleteAllAction){
        return Listunmodifiable([]<Note>);
    }

   return state;
}
- To use our state, we wrap it up in a store and then wrap our MaterialApp in a StoreProvider.
class MyApp extends StatelessWidget {
  @override
  Widget build(BuildContext context) {
    final Store<AppState> store = Store<AppState>(
      appStateReducer,
      initialState: AppState.initialState(),
    );

    return StoreProvider<AppState>(
      store: store,
      child: MaterialApp(
        title: 'Redux Items',
        theme: ThemeData.dark(),
        home: MyHomePage(),
      ),
    );
  }
}
This is a very brief overview of Redux in Flutter. But there's more to Redux such as StoreConnectors, Viewmodels, and Middleware. I highly recommend taking a look at the official documnetation .
Thanks for your time!

